Practical Nerdery Little projects and uncomplicated write-ups

On Writing Alfred Workflows in Python

Automate all the things

A story about friction and wasted time

There are a lot of big and small tasks we perform on our computers every single day. Even when they are simple, they sometimes carry a tiny amount of friction and always require time to complete. If you just do them once, there is no big deal. But, often, we do them over and over again, day in and day out, so their cumulative cost adds up into a not trivial amount.

🤨 Hey, I’m pretty skeptical, please give me something more tangible

I use an app called TextExpander every day to automatically expand abbreviation into snippets of text I often use throughout the day.

For example, when I type:

  • ;me TextExpander replaces it with my full name, “Maurizio Branca”
  • ;em with my email address
  • ;pr with my favourite template for pull-requests
  • ;shrug with ¯\_(ツ)_/¯

TextExpander Stats

The Raw Numbers

According to TextExpander, in the last 50 days, I saved 47 minutes just expanding abbreviations into the text instead of typing it on my keyboard.

TextExpander Stats

It might or might not feel like a big deal, but actually, I saved time AND removed friction from my workflow. And every time a expand a multiple words text or a template, I feel really good.

But TextExpander is not for developers!

I started with TextExpander because it is kind enough to give us the numbers, but today I want to write about another tool that can save you time and remove friction: Alfred, for macOS.

What is Alfred?

One application to launch them all

Alfred is a desktop application launcher for macOS.

It’s not the only one: there are a good number of launchers for macOS: LaunchBar, the venerable Quicksilver and the built-in Spotlight from Apple.

Alfred is my favorite.

Features

You can use Alfred to launch applications, perform simple calculations, lookup locations using map services, search products on Amazon, or anything else on Google.

Alfred example

The already mentioned features can be a convenient and useful tool, but the most powerful and impressive stuff comes out of the Powerpack if you have some development skills.

If you’re willing to pay £29.00, you’ll get the real value out of it.

💰⚡️ The Powerpack

Here’s what you get if you purchase the Alfred Powerpack.

  • Clipboard history — you can search and paste again up to three months of text copied in the pasteboard (it’s how macOS call the clipboard)
  • Snippets — a basic TextExpander built-in Alfred
  • Files
  • View Contacts — search end open your contacts, great for lookup a phone number or an email address in an instant
  • Workflows
  • and more.

Clipboard history is a killer feature to me, but Workflows are a real game-changer.

Workflows

Workflows are an extension mechanism that allows third-party developers to write their own additional feature that can be plugged in Alfred, triggered, and executed from Alfred typing a short keyword.

Alfred Workflow Panel

Workflows can be written in virtually any language that can write XML, the default markup used to communicate between Alfred and the workflow (more on this later).

Today I want to share how to write useful custom workflows using Python.

Introducing Alfred-Workflows

There is probably one framework to build Alfred workflows for every popular language out there, but the Python-based Alfred-Workflow from deanishe absolutely stands out for its features and good documentation.

Over the last few months, I created multiple workflows to scratch an itch and solve practical problems, and it’s been delightful.

Example: ClasseViva

ClasseViva is the electronic class register used by a lot of schools here in Italy.

I build this small workflow using my own library https://github.com/zmoog/classeviva-client to access my older kid’s grades with very few keystrokes (four keys: <alt> <space> <cv> <v> to summon Alfred and type cv the keyword for this shortcut).

Alfred Workflow ClasseViva

The alternative was to open a new browser tab/window, log into the website, select the grades.

Example: Arduino CLI

Sometimes I need to peek at the details of one of the Arduino boards connected to my laptop, or list the installed core or search through the installed libraries using the Arduino CLI.

I always have a terminal open on my Mac running zsh, and I use reverse search a lot, but a well-prepared launcher app can be even quicker.

Launchers are great when you have a limited set of recurring actions you repeat every day (or maybe even every hour or few minutes) you can optimize for.

An Alfred workflow is perfect for this kind of stuff.

Alfred Workflow Arduino CLI

Source code

You can browse the final project by visiting https://github.com/zmoog/alfred-arduino-cli/.

Are you on Linux?

If you’re not on Mac, give https://github.com/umbynos/arduino_cli a try; it’s a Python plugin built by my dear teammate and friend @umbynos for the Albert launcher.

It’s still in progress but very promising, and @umbynos is accepting contributions!

High-level overview

Let’s get a general idea about how workflows work in Alfred, using this as an example.

When you type the keyword on Alfred, then it:

  1. Alfred triggers the workflow.
  2. The workflow executes the arduino-cli file with the input prepared by the workflow.
  3. the arduino-cli runs the command and writes the result to the standard output using the JSON format.
  4. When the arduino-cli finishes, the workflow parses the JSON output and builds the response to return to the Alfred core.

Alfred Workflow Arduino CLI

Check arduino-cli.py out to see how the Arduino CLI workflow has been implemented.

How to Create a new Workflow

If you want to start creating your own workflows in Python using Alfred-Workflows, your best option is to start with the great Tutorial Part 1: Creating a Basic Pinboard Workflow.

This short and focused tutorial explains how to build a simple Pinboard workflow from scratch.

1. Trigger the Workflow

I used a script filter to trigger the workflow by typing cli on Alfred.

Alfred Workflow Arduino CLI Panel

When I select one of the actions available, Alfred will run the Python script python arduino-cli.py core list {query} behind the scene, replacing {query} with the text I typed and then waiting for the script to execute and return the response XML.

2. The Workflow Executes

The script is a regular Python script you can also run on the terminal for testing and troubleshooting.

def main(wf):
  
    # build argument parser to parse script args and collect their
    # values
    parser = argparse.ArgumentParser()

    # add a required command and save it to 'command'
    parser.add_argument('command') 
    # add a required sub command and save it to 'sub_command'
    parser.add_argument('subcommand', nargs='?', default='none')
    # add an optional query and save it to 'query'
    parser.add_argument('query', nargs='?', default=None)

    # parse the script's arguments
    args = parser.parse_args(wf.args)

    Handler(args, wf).run()


if __name__ == u"__main__":
    wf = Workflow(libraries=["./libs"])
    log = wf.logger
    sys.exit(wf.run(main))

The Alfred-Workflow library does the heavy-duty of offering a nice API to indirectly produce the XML Alfred requires to work with workflows, plus many useful goodies.

  • Fuzzy, Alfred-like search/filtering with diacritic folding
  • Simple, persistent settings
  • Simple, auto-expiring data caching
  • Keychain support for secure storage (and syncing) of passwords, API keys, etc.
  • Lightweight web API with a requests-like interface

And more, check out the full list of features.

3. Run the actual arduin-cli binary

The real work is performed by the Arduino CLI.

The workflow uses Invoke to run the CLI binary, collect and parse the JSON returned in the standard output.

Invoke

To keep the workflow as simple as possible, I used the --format json option available for most CLI commands. The result is returned as a nice JSON that can be easily parsed using the built-in json module.

def run_command(cmd):
    from invoke import run
    
    cmd = "./arduino-cli {cmd} --format json".format(cmd=cmd)

    result = run(cmd, hide=True, warn=True)
    if not result.ok:
        raise Exception(result.stdout)

    return json.loads(result.stdout)

4. Build a response for Alfred

Finally, the workflow uses the CLI data to build the Alfred items that drive its UI.

    def handle_version_none(self):
        
        version = run_command("version")

        self.wf.add_item(title=version["VersionString"],
                         subtitle='version')
        self.wf.add_item(title=version["Commit"],
                         subtitle='Commit')
        self.wf.add_item(title=version["Status"],
                         subtitle='Status')

        
        # Send the results to Alfred as XML
        self.wf.send_feedback()

And finally, when the Python script is done, this is what Alfred get back:

<?xml version="1.0" encoding="utf-8"?>
<items>
    <item valid="no">
        <title>0.16.0</title>
        <subtitle>version</subtitle>
    </item>
    <item valid="no">
        <title>c977a2382c2e7770b3eedc43e6a9d41f4a6c3483</title>
        <subtitle>Commit</subtitle>
    </item>
    <item valid="no">
        <title>alpha</title>
        <subtitle>Status</subtitle>
    </item>
</items>%  

Conclusion

If you spend hours a day sitting in front of a computer for work, it’s hard to imagine you don’t have a small activity you have to repeat over and over that could benefit some automation.

Is it worth the time?

The next time you feel that impalpable sense of discomfort for having to repeat a tedious task one more time, well, think about if you can automate it using your language of choice. Build it and then make it super convenient to run from the slick Alfred UI, turning it into an Alfred Workflow.

Start small with something you need to “fix”, like opening the same site 1-3 times a day to check some information you need or generate UUIDs on the fly, or a password, all with less than a handful of keystrokes.

And have fun along the way.

Music

This post has been written listening to Black Market by Weather Report.

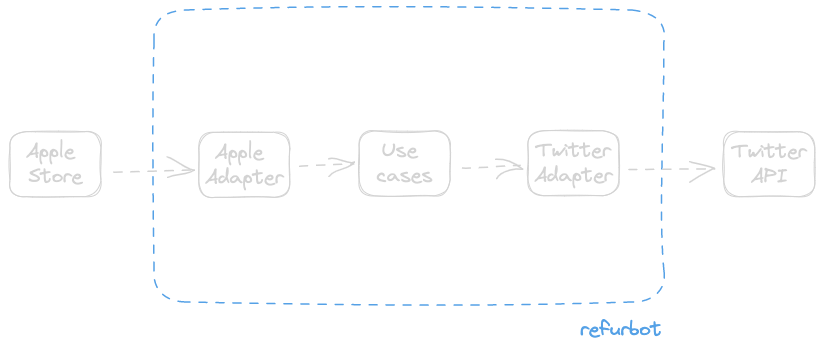
Refurbot: a serverless bot that tweets

The Serverless Opportunity

Writing bots is fun. Sometimes it is even useful, but you write a bot most of the time because it is entertaining.

But once you have written one, traditionally, you had to deal with the hassle of keeping them running indefinitely on your computer, on some random Pis, or on an EC2 instance.

Are there other solutions to run a bot?

Hell, yeah: a serverless bot! ⚡️

Even better, bots are one kind of application that can be run efficiently within most cloud providers’ free tiers.

In this article, I’ll share with you how I built @Refurbot (code is available at https://github.com/zmoog/refurbot), a Twitter bot that every day tweets the best deal available in the refurbished products section of the Apple Store.

Introducing Refurbot

Every morning at 9 am (CET), Refurbot will wake up and have breakfast. It will then access the Apple Store to fetch the latest deals, find the best one (percentage-wise), and tweet it to its vast audience (it’s just me).

Refurbot Architecture

Architecture

Refurbot is a simple serverless application written in Python. It has been designed using the clean architecture principles, even if such a simple project should not really deserve this special attention.

Refurbot Architecture

Sometimes, we do such things “just because we can.” Still, in this case, I think it’s useful to test or practice using simple context and then progressively move up to something more complex No, I’m lying, I just read the two books Architecture Patterns with Python and Clean Architectures in Python and I want to practice!)

Commands and Events

A more detailed overview of the Refurbot architecture.

Refurbot Architecture

Step 1 — Schedule it

We are using the CloudWatch Event to fire up an event and trigger the lambda execution:

functions:
  run-scheduled:
    handler: refurbot/entrypoints/aws/cloudwatch/events.run_scheduled
    timeout: 10 # sometimes the Apple's refurbished store hangs for a few seconds.
    events:
      - schedule:
          name: run-scheduled
          rate: cron(00 8 ? * MON-SUN *)
          enabled: true
          input:
            commands:
              SearchDeals:
                country: us
                product: mac

Step 2

The lambda function starts and publishes a SearchDeals command in the MessageBus:

def run_scheduled(event: Dict, config: Any):

    cmd = commands.SearchDeals(
        country='us',
        product='mac'
    )

    messagebus.handle(cmd)

In a real project the lambda should use the event data to build the command, but in this sample project we’ll just build a SearchDeals command.

Step 3

The MessageBus looks up the right command handler and invoke it. The command handler contains the business logic to fullfil the command.

Step 4 and 5

The handler executes the real business logic: in this case, search the Apple Store end create a DealsFound event:

def search_deals(cmd: commands.SearchDeals,
                 uow: UnitOfWork,
                 _: Dict[str, Any]) -> List[events.Event]:

    with uow:
        deals = uow.refurbished_store.search(cmd.country, cmd.product)

        if not deals:
            return [events.DealsNotFound(
                country=cmd.country,
                product=cmd.product,
            )]

        # get the deal, arbitrarily defined as the one with the
        # max saving percentage
        the_best_deal = max(deals, key=lambda deal: deal.saving_percentage)

        return [events.DealsFound(
            country=cmd.country,
            product=cmd.product,
            deals=list(deals),
            best_deal=the_best_deal,
        )]

Each command handler exececution usually created one or more events.

Step 6 and 7

Now the MessageBus handles the DealsFound event, updating the status on Twitter:

def tweet_deals(event: events.DealsFound,
                uow: UnitOfWork,
                context: Dict[str, Any]):

    with uow:
        text = "Hey, ... [cut]"
        uow.twitter.update_status(text)

Libraries

Refurbot is using a few libraries:

But there is another one that is dear to me (just becouse I’m the author).

Refurbished

Refurbished is a simple Python library (also available on PyPI) used to scrape the Apple Store and search for refurbished products.

Library

Refurbot is using it from the Adapter:

>>> from refurbished import Store
>>> store = Store(country="us")
>>> ipads = store.get_ipads()
>>> 
>>> print(next(ipads).name)
Refurbished iPad mini 4 Wi-Fi + Cellular 64GB - Silver

Use the CLI Luke!

Once installed, the library comes with a nice CLI you can use to search products from the terminal:

% rfrb it macs --min-saving=300

1979 1679 300 (15%) MacBook Pro 13,3" ricondizionato con Intel Core i5 quad-core a 2,4GHz e display Retina - Argento

... (more)

Wrapping up

Serverless is a good fit for bots: there aren’t any process running idle waiting for events consuming resources (CPU, RAM, etc). The application is started when needed, and when it’s done that’s it.

But you know: there ain’t no such thing as a free lunch. Serverless solutions come with their own sets of trafe offs, like lambda functions cold start, potential “vendor lock in”, and more.

TIL: how to replace an external Go dependency with a local copy

The Problem

You’re using a great open source library in your project, and then, one day, you find yourself thinking:

“Oh, wouldn’t be great if the author just added a tiny little log statement in that function?”.

Yeah, it really would, this would allow me to trace the value of that variable or try a small change.

What can you do: fork the library? Nope. Don’t do that.

Replace it!

You can temporarily replace the original module with a local copy, changing one line in your go.mod file.

Example

Here’s a minimal example of a small go.mod, the file every Go project uses to handle dependencies:

module github.com/zmoog/foo

require (
    github.com/zmoog/bar v0.1.0
)

To replace the module github.com/zmoog/bar with a local copy located on your local disk, all you need to do is add a new line with the replace directive:

module github.com/zmoog/foo

replace github.com/zmoog/bar => /Users/zmoog/code/projects/bar

require (
    github.com/zmoog/bar v0.1.0
)

That’s it! 🥳

Now, when you recompile or run your code, the local copy will be used with all your local changes.

Conclusion

The replace directive is a nice little tool for this use case.

Notice

Don’t ever commit these changes into your repo, they’re meant to be transient and should be thrown away after use.